(Estimated total reading time: 20-25 minutes, unpaid endorsements only)
What is Crapstroke Phobia even?!
I recently received an inquiry on Instagram which made me ponder my own fears and shortcomings as an illustrator – specifically what I like to call crapstroke phobia (sounds conveniently like the fear of enclosed spaces, doesn’t it?). In less scientific terms, it is the stifling fear of making the next stroke when a drawing is beginning to look really good. So seeing as I have a bit of experience with this topic after three years of hobby illustration, I thought “Why not provide a few helpful pointers to other aspiring illustrators who may find themselves cornered in a similar way?” I don’t profess to know everything, far from it, but I would have liked to receive some guidance back when I first felt crapstroke phobia strike.
Alright, so the person writing me had made a great start to a bird illustration, using traditional pencils on paper to create a very naturalistic looking head and a promising outline of the rest of the bird. Now, however, she found herself paralyzed with fear (her words) over making one or more crucial mistakes when continuing with the illustration – after all, any further pencil stroke could compromise the excellent work she had done so far, even with erasers as a backup. I completely get it; in fact, this was almost like hearing my own inner voice in the past, when I used to abandon any drawing or sketch that showed even a little bit of promise.
The result? A vast library of doodles that could have made it big (or not), but ended their life being, say, a half-finished chest plate, a detached human hand, a torn-off angel’s wing, a free floating whale fin, an abandoned insect carapace, half a war machine, and the single eye (that timeless classic) – the list goes on. My rationale was that halfway done was good enough; I had taken as much as I could learn from the piece without making any major errors along the way… and it felt like an achievement to have created
something that retained that unspoiled purity. It was a real ego boost back then, but if you ask me today what happened to all those unfinished pieces the answer would be: “I haven’t the faintest clue!” Apparently, my fondness for the incomplete was fleeting, and in time I have grown to love my finished works so much more, mistakes and warts and all.
So how have I gotten to that point? Well, let me break it down into different sections so you’ll get a free tour inside my self-reflecting mind (scary, scary) as well as a couple of tips that might help you get off that ramp and fly towards the stars yourself. Grab a cup of your fave beverage and settle in, though, because it may take a little before we get to the juiciest parts.
Don’t Panic! Crapstroke Phobia is OK!
Let’s just get this one out the way first: I still suffer from mild crapstroke phobia (CP) and will definitely find myself stuck in the middle of a piece from time to time, afraid of what limitations my next move might bring forth. After all, every path chosen bars the entry to all other paths, and will you ever truly
know where you could have taken the artwork instead? The way I see it, CP stems from a wish to create perfection… which is extremely laudable. However, you learn a million times more from your failures than you do from your successes, so making no failures means moving forward with only a fraction of what you could have gotten out of the creative process. That should be your mindset. Unless you are working on a tight timeline for a commission, you should first and foremost be creating for yourself – and as a service to the future you. If you still find yourself freezing up, ask yourself this liberating question: Is this really the very last portrait of that motif I am ever going to draw in my life?
If the answer is yes, well, then you clearly do not care all that much for this particular drawing subject and so you should have no massive fears of ruining it, right? I mean, that is just logical.
If the answer is no (and this is my default one), then think of how much better the next version of this subject will be with everything you will have learned on avoiding X, applying less Y, and crossing Z off your list of good angles/poses for this piece.
My take-away here is: Drawing an unfamiliar subject is like wandering in an unknown area. You may not know your way, and there will definitely be a few wrong turns along the way, but you will explore and learn so much more than when in familiar surroundings. In time, you can then return and appreciate the scenery that much more, diving into certain parts of it and leaving others for the next fun stroll. Just make sure you come prepared for that first trip into the unknown, which brings me to my humble offering of tips for your drawing journey…
Tip 1: Tool Up, Space Cadet!
At the risk of sounding like Tim “The Toolman” Taylor, you need to procure the right tools for the task before going ahead, knowing the advantages and limitations of each type of medium. That way, you cannot blame a lack of progression on a lack of tools – which is a classic pitfall, and a dangerous one! (hint: buying more tools is an expensive way to procrastinate!)
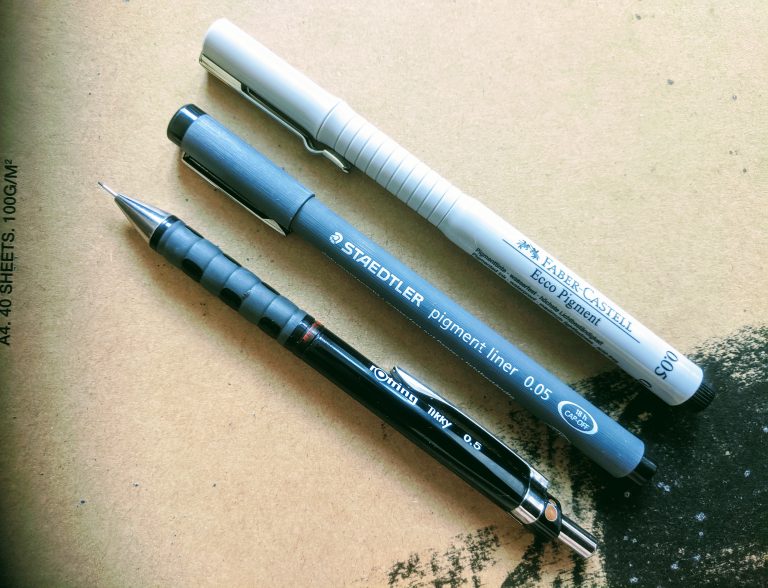
I am partial to ink fineliners myself, currently working with 0.05 Ecco Pigment Liners from Faber-Castell and 0.05 308 Pigment Liners from Staedtler. The former gives me pinpoint precision, but the latter is a real workhorse for longer sessions and lends a certain vintage quality to dotworking. Before any fineliner gets to grace the paper, though, I have already laid down some careful outlines using the 0.5 Rotring Tikky mechanical pencil I favour for this type of work. I like to compare drawing tools to cars, and so I want you to imagine your local pen pusher as a car dealership offering these four types of automobiles:
- Ferrari
- Subaru
- Toyota
- Ford Pinto
Alright, so go ahead and get that flashy Ferrari – I know it’s tempting, but let me ask you this: how much mileage will it actually get? A fancy drawing tool is one you are afraid of breaking or wearing down, and it may even be designed with an emphasis on looks rather than long-term performance. So I go for the Subaru type of tools: upper part of the price index and simple, yes, but durable as hell! Remember that the longer time you spend with a particular tool, the better you get to know it. For more routine tasks, or if you are on a budget, do get the Toyota and save your moleskin the whipping – however, steer well
clear of the Ford Pinto of utensils. Unless your budget is so strained that you are literally choosing between the Pinto or nothing, I suggest you respect yourself as an artist and make a reasonable investment here. It will clear your path forward of many troublesome rocks.
Turning to the topic of paper, make sure that yours is just right for what you want to create and have a test sheet of it lying around to see how it interacts with your tools at any given time. When working in ink, I usually go for paper that has a density of minimum 190 g/m2 (metric gram per square meter), like those from Brunnen, and while I prefer a bit of a grainy structure I make sure that it won’t compromise my finer lines and layering. Too fat a paper, and you’ve crossed the border to watercolour land – which is just overkill for any original made with pencils and/or fineliners.
Tip 2: Reference Your Preference
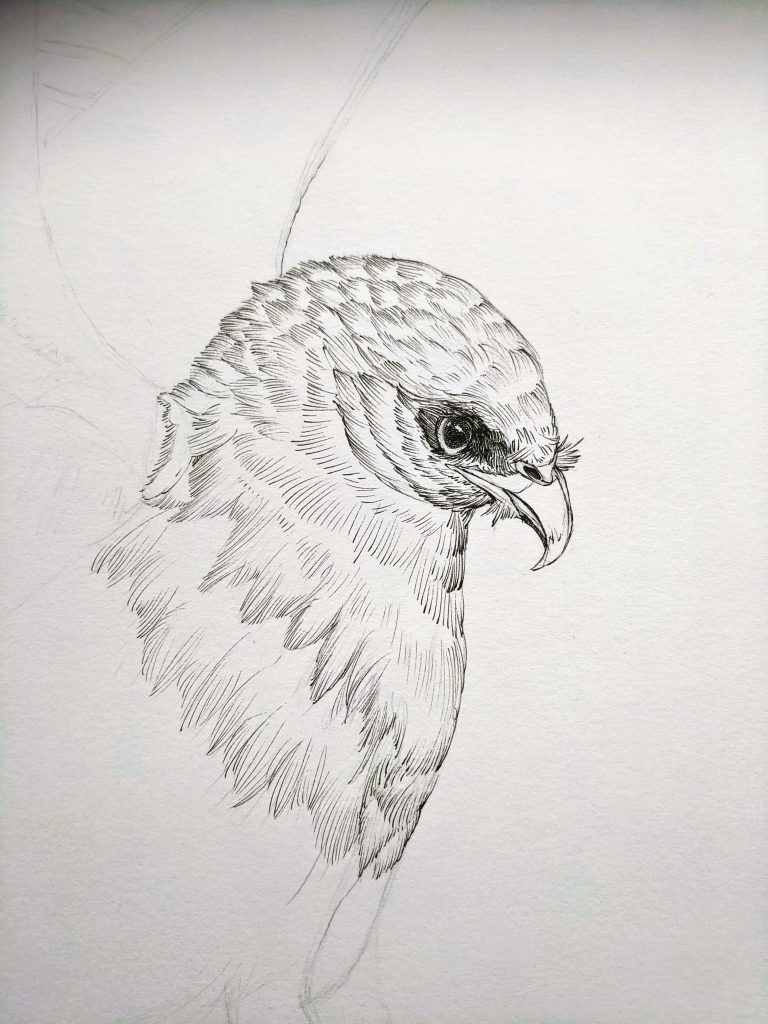
Most of the time, and unless you are really lucky, you will need to work with a reference photo. I love drawing animals, and since I recently completed a white-tailed kite (Elanus leucurus, a bird of prey) for a short story I am working on, I will use that for an example. If you do not have your own (i.e. taken by yourself) photo for reference, you will need to borrow that one. My suggestion is to make use of the great free content offered under the Creative Commons license, which you can find on Wikimedia Commons and similar sites. Most of these will allow you to create a derivative (such as a drawing) without much in the way of attribution – but do make sure to check what license type belongs with your photo of choice, and remember: It is never a bad idea to credit the original photographer when you work from only one photo. A copyright logo, their name, and the year the photograph was taken go a long way towards that end.
For my own white-tailed kite, I did not find one single, perfect shot of it and thus used several for reference: a juvenile aerial shot by Len Blumin (© 2007; CC BY 2.0), a very crisp perching pic by Susan Cook (© 2020; CC BY 2.0), and a classic compilation of poses from Richard Crossley’s guide to Eastern Birds (© 2013; CC BY SA 3.0). I recommend you do this exercise with any animal, and if you are feeling particularly perfectionist it is always fun to look for some anatomy shots. Once you get how bones, limbs, and tendons etc. all connect and move together under the fur/feathers/skin, that unique under-the-hood knowledge can be a lifesaver if you reach an area you are just not sure what the animal uses for. For grade A research points, supplement with a YouTube video or two of the animal in action. It is never a waste. The excellent late-2016 cavalcade of white-tailed kite video footage uploaded by Phoo Chan (shown above) helped me understand and appreciate the raptor bird even more.
Without further ado, this is about as far as I got with my white-tailed kite before I felt the first four signs of crapstroke phobia: fumbling, frustration, fear, procrastination…:
That’s It! (For Now)
Alright, look at you making it as far as to this sentence! That’s an impressive display of patience right there, and I hope you remember those key takeaways:
- Fear of failure is understandable, but don’t be a victim to crapstroke phobia. Know what is holding you back and remember the rewards for going forward anyway. You got this!
- Prepare properly for your drawing, so you don’t have an excuse to stall. Do this by procuring tools and reference shots aplenty. Forewarned is forearmed, as any boy scout will attest to.
Before this blog gets even longer, however, I am pushing forward the next handy tips to a follow-up blog post. So check back with me before long, as I showcase the final kite drawing and elaborate on these little nuggets:
- Tip 3: Daredevils Don’t Duplicate (…but you might want to)
- Tip 4: Don’t Forgo Failure – Van Gogh It!
- Tip 5: Grieve If You Must, But Move On!
